Creating a Meaningful Nativity in the Desert Shadow Box for Your Home
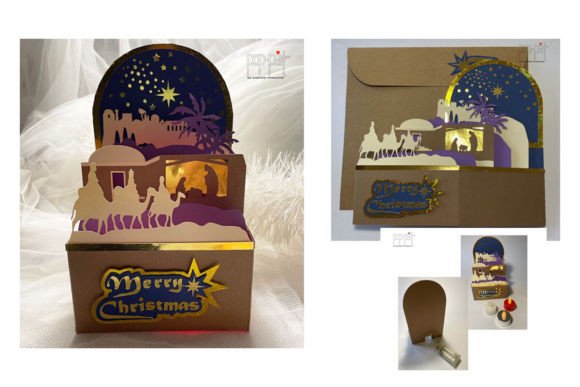
There is a profound sense of peace that comes from crafting a scene that tells a story, especially one as timeless as the birth of Jesus. When you decide to Celebrate Christmas by making your own decoration, you are not just filling a shelf; you are inviting warmth and personal history into your living space. The Nativity in the Desert Shadow Box offers a unique way to capture the holy night where baby Jesus lay in the manger, surrounded by praying figures, animals, camels, and the vast, quiet desert. Unlike store-bought ornaments that often lack depth or soul, a handmade 3D shadow box brings layers of meaning and visual vibrancy to any room.
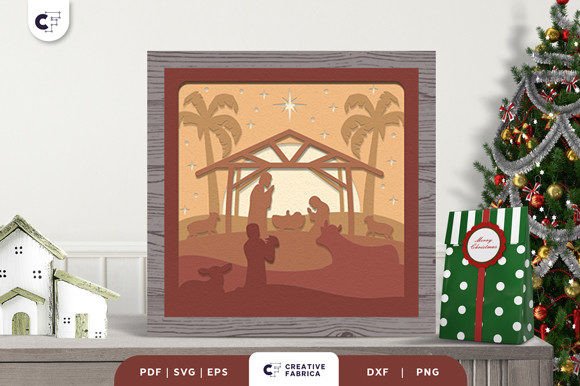
This project centers on a design inspired by the Born of Jesus 3D Shadow Box. It utilizes six distinct layers of paper to create a stunning three-dimensional effect. When light hits these layers, shadows dance across the scene, highlighting the reverence of the moment. However, moving from a digital file to a finished piece of home decor requires more than just enthusiasm. Many creators, whether beginners or seasoned professionals, overlook critical details that can compromise the final result. By understanding common pitfalls and adopting a strategic approach, you can ensure your nativity scene becomes a cherished heirloom rather than a frustrating experiment.
Choosing the Right File Format for Your Machine
One of the first hurdles you will encounter is selecting the correct file format. The design is typically available in SVG, PNG, EPS, PDF, and DXF formats. A frequent mistake is downloading a file without considering the specific capabilities of your cutting machine. If you own a Cricut, Silhouette, or ScanNCut, compatibility is key. For instance, while PNG files are great for printing, they do not provide the cut lines necessary for layering unless you manually trace them, which introduces error and wasted material.
To avoid this, always match the format to your tool. Use SVG or DXF files for vector-based cutting machines like Cricut and Silhouette, as these preserve the precise paths needed for intricate details like the camels or the stable roof. If you are using a scanner-based cutter like the Brother ScanNCut, the PDF or high-resolution PNG might be preferable depending on your workflow. Downloading the wrong format can lead to jagged edges, misaligned layers, and ultimately, a shadow box that lacks the crisp definition required for a professional look. Take a moment to verify your machine's requirements before you begin cutting.
The Critical Role of Paper Weight and Texture
Another area where projects often falter is the choice of material. The structural integrity of a six-layer shadow box depends entirely on the cardstock used. Using standard printer paper or lightweight craft paper is a common error that results in sagging layers and a flat, unimpressive appearance. The paper must be rigid enough to hold its shape when glued yet thin enough to fit within the frame.
For optimal results, it is highly recommended to use Encore Cardstock 80 lb cover (216 gsm). This specific weight provides the perfect balance, allowing the layers to stand out distinctly without buckling under the weight of adhesives. Lighter paper may warp when glue is applied, ruining the clean lines of the desert landscape. Heavier board might be too thick to fit multiple layers into a standard frame. Before purchasing materials, check the specifications of your shadow box frame depth. A well-chosen cardstock ensures that the scene of Jesus in the manger remains vibrant and dimensional for years to come. You can explore suitable options at the 12×12 Cardstock Shop (note: this is a paid link at no extra cost to you) to find colors that complement the desert theme.
Assembly Techniques for Depth and Durability
Once your pieces are cut, the assembly phase begins. This is where many hobbyists rush, leading to misalignment and a loss of the 3D effect. The design relies on six specific layers to create depth. If these layers are not spaced evenly, the perspective of the desert and the figures will look distorted. A common misunderstanding is that any adhesive will work. However, liquid glues can soak into the paper, causing discoloration or warping, while double-sided tape that is too thin fails to create sufficient separation between layers.
To achieve the best outcome, use foam adhesive squares or specialized spacer tapes designed for papercrafting. These provide a consistent gap between each layer, enhancing the shadow play that defines this art form. Start from the background layer—the deep desert sky—and work your way forward to the foreground figures. Press firmly but gently to ensure adhesion without crushing the paper. Taking your time here ensures that every element, from the smallest animal to the star above, sits exactly where it should, creating a cohesive and reverent scene.
Framing and Final Presentation
The final step is placing your creation into a standard shadow box frame. A frequent oversight occurs when creators assume all frames are identical. The internal depth of the frame must accommodate the total thickness of your six layers plus the adhesive. If the frame is too shallow, the glass will press against the top layer, flattening the 3D effect and potentially damaging the delicate paper edges. Always measure the cumulative thickness of your assembled piece before purchasing or committing to a frame.
Additionally, consider the lighting in the room where the nativity will be displayed. The beauty of a shadow box lies in how light interacts with the layers. Placing it in a dark corner negates the effort put into creating depth. Position the frame where natural light or a dedicated accent light can cast soft shadows across the desert scene, bringing the prayerful atmosphere to life. Remember that the images you see online are for preview purposes only; the actual final product color may slightly vary due to lighting sources and the specific hue of the paper you choose. Embrace these variations as part of the handmade charm.
Making a Thoughtful Decision
Before diving into this project, evaluate your goals. Are you creating a gift, a centerpiece for your home, or a product to sell? If you are an entrepreneur or small business owner looking to offer unique holiday decor, ensuring consistency in your materials and assembly process is vital for customer satisfaction. For hobbyists and educators, this project serves as an excellent lesson in patience, precision, and storytelling through art.
The Nativity in the Desert Shadow Box is more than a craft; it is a meditation on the holy night. By avoiding common mistakes regarding file formats, paper selection, and assembly techniques, you elevate your work from a simple DIY task to a meaningful piece of art. Whether you are a beginner picking up a cutting machine for the first time or a professional refining your portfolio, attention to detail makes all the difference. With the right preparation and a focus on quality, you can create a decoration that truly celebrates the spirit of Christmas, bringing warmth and vibrancy to your space for generations.